

Vibrant Beetroot Pav: A Naturally Colorful Twist on a Classic Indian Bread

2 hours 20 minutes
918 reads
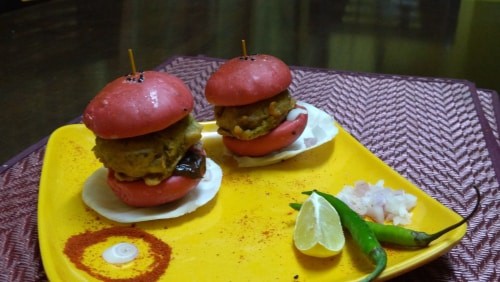
About Vibrant Beetroot Pav: A Naturally Colorful Twist on a Classic Indian Bread
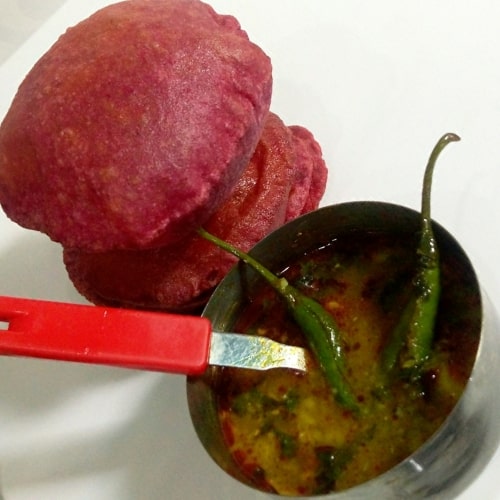
Transform your breakfast or snack into a vibrant feast with Beetroot Pav, a stunning magenta twist on Mumbai's iconic street food. Imagine soft, fluffy rolls infused with the earthy sweetness of beetroot – a healthy and beautiful addition to your table.This recipe captures the traditional pav's pillowy texture while adding a nutritious boost and gorgeous color from beetroot puree. A touch of red food coloring (optional) deepens the hue, creating a truly eye-catching treat.Enjoy these versatile Beetroot Pav with your favorite curry, a spicy potato vada, or simply alongside a steaming cup of chai for a delightful culinary experience.
Stop Thinking About What to Cook Every Day
Healthy Eating, Kids Tiffin, PCOS and Weight loss meals, all planned out for you. Just follow the plan and cook. From ₹299.
Recipe Time & More
Prep2 hours
Cook20 minutes
Total2 hours 20 minutes
Ingredients
For the Beetroot Puree
- 1 cup Beetroot cooked and finely pureed
For the Dough
- 1/2 Tbsp Active Yeast dry
- 3 Tbsp Water 35-40°c, warm
- 1/2 tsp Sugar
- 2 1/4 cup All-Purpose Flour plus more for dusting
- 1 tsp Salt
- 2 Tbsp Beetroot Juice from the cooked beetroot puree
- 1 Tbsp Milk Powder
- 2 Tbsp Milk
- 1/2 Tbsp Butter melted, unsalted
- 1/4 tsp Food Coloring optional, red
For Brushing and Topping
- 2 Tbsp Milk
- 1/2 Tbsp Butter melted, unsalted
- 1/2 Tbsp Kalonji Seeds
- 1 Tbsp Oil for greasing
Instructions
- In a small bowl, dissolve the sugar in warm water. The water should be around 35-40°C, warm to the touch but not hot. This creates the perfect environment for activating the yeast.
- Sprinkle the yeast over the warm sugar water. Let it stand for 10-15 minutes until the yeast is foamy and bubbly. This indicates that the yeast is active and alive.
- In a large mixing bowl, sift together the all-purpose flour and salt. Sifting aerates the flour, resulting in lighter pav.
- Add the beetroot puree, beetroot juice, milk powder, and optional red food coloring to the dry ingredients. Mix well to combine.
- Pour in the activated yeast mixture, melted butter, and milk. Stir until a shaggy dough forms.
- Turn the dough out onto a lightly floured surface. Knead for 10-12 minutes until the dough becomes smooth and elastic. Kneading develops the gluten, which gives the pav their structure.
- Lightly grease a large bowl with oil. Place the kneaded dough in the bowl, turning to coat it with the oil. This prevents the dough from drying out.
- Cover the bowl tightly with plastic wrap. Let the dough rise in a warm place for 1-1.5 hours, or until doubled in size. This first rise allows the yeast to ferment and produce flavorful, airy pav.
- Punch down the risen dough to release the air. This helps to create an even texture.
- Divide the dough into 5 equal portions. Shape each portion into a smooth ball.
- Arrange the dough balls on a baking tray lined with parchment paper. Leave some space between them for expansion.
- Lightly grease the dough balls with oil. Cover the tray with plastic wrap and let the pav rise for another 45 minutes to 1 hour, or until almost doubled. This second rise contributes to the pav's soft texture.
- Preheat the oven to 180°C (350°F).
- Whisk together the melted butter and milk for brushing. Gently brush the risen pav with this mixture. This adds flavor and helps create a golden crust.
- Sprinkle the kalonji seeds over the brushed pav, pressing them gently so they adhere.
- Bake for 13-15 minutes. Then, increase the oven temperature to 200°C (400°F) and bake for another 3-4 minutes, or until the pav are golden brown. The higher temperature at the end helps achieve a beautiful color.
- Remove the baked pav from the oven. Brush them with a little melted butter or oil while they are still warm. This softens the crust. Cover the pav with a clean kitchen towel to keep them soft.

- Serve warm with your favorite accompaniments, such as batata vada (potato fritters), vegetable curry, or a comforting cup of chai.
Recipe Notes
Good To Know
- Red food colour is optional.
- Use additional milk if required for kneading.
- Use good quality yeast.
- Avoid overcooking.
- For an even deeper beet flavor and richer color, roast the beetroot before pureeing instead of boiling—it intensifies both the sweetness and the hue of the pav.
- If you want to keep the pav entirely vegan, substitute the milk powder and milk with oat or almond milk, and use coconut oil or vegan butter in place of dairy butter.
- Allow the pav to cool completely before slicing, as cutting while warm can compress the crumb and diminish the airy texture typical of pav.
- Serve the beetroot pav with a bright coriander-mint chutney or a tangy tamarind dip to complement the earthy-sweet notes and elevate the snack experience.
Expert Tips
- For a smoother beetroot puree, peel and chop the beetroot before boiling or roasting. This will ensure a uniform texture and vibrant color in your pav.
- Don't overmix the dough. Overmixing can develop the gluten too much, resulting in a tough pav. Mix until just combined.
- Brush the tops of the pav with melted butter or oil before baking for a soft, golden crust.
Storage Instructions
- Store leftover beetroot pav in an airtight container at room temperature for up to 2 days or in the refrigerator for up to 5 days.
Related Posts You May Like






Recipe Nutrition
Calories: 25kcalCarbohydrates: 5gProtein: 1gCholesterol: 1mgSodium: 456mgFiber: 1gSugar: 4g

sujata hande
Articles: 50
6 Comments
Leave a Reply
You must be logged in to post a comment.
Looks so incredible! Thank you for sharing.
What a delicious idea! Thanks for sharing.
This is exactly what I was looking for!
What a great recipe! Thanks for sharing.
Very Nice recipe.

I’m excited to try this recipe!