

No-Bake Chocolate Digestive Biscuit Pudding with Strawberries

2 hours 20 minutes
1333 reads
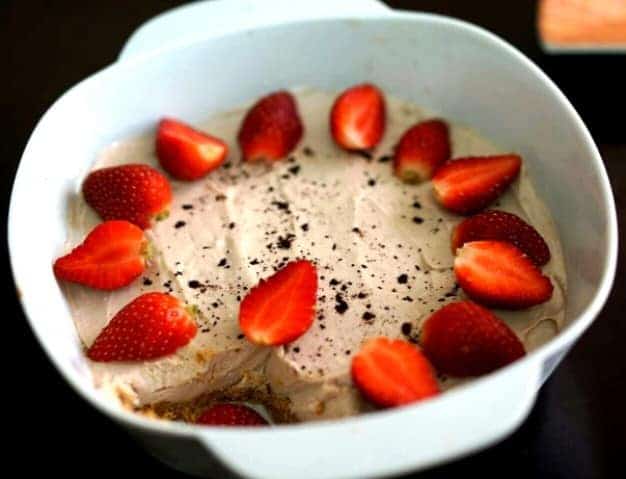
About No-Bake Chocolate Digestive Biscuit Pudding with Strawberries
Craving chocolate? Dive into the blissfully easy No-Bake Chocolate Digestive Biscuit Pudding. This dreamy dessert is pure magic, layering crunchy biscuits with a cloud of luscious chocolate whipped cream and juicy strawberries.Ready in minutes with no baking required, it's the perfect quick treat or elegant finale to any meal. Imagine the buttery crunch of digestives melding with rich chocolate and the sweet burst of fresh berries.It's a symphony of flavors and textures that will have you reaching for seconds…and thirds!

Stop Thinking About What to Cook Every Day
Healthy Eating, Kids Tiffin, PCOS and Weight loss meals, all planned out for you. Just follow the plan and cook. From ₹299.
Recipe Time & More
Prep20 minutes
Cook2 hours
Total2 hours 20 minutes
Ingredients
Biscuit Base
- 9 Digestive Biscuits
- 3 tbsp Butter melted
- Sugar powdered, to taste
Garnish
- Strawberries halved, to taste
- Cocoa Powder to taste
Instructions
- Crush the digestive biscuits into fine crumbs using a food processor or by placing them in a sealed bag and crushing them with a rolling pin.
- Combine the crushed biscuits, melted butter, and powdered sugar in a bowl. Mix well until the crumbs are evenly moistened.
- Press the biscuit mixture firmly into the bottom of a rectangular dish or pan to create an even base. This will form the crust of your pudding.
- Refrigerate the biscuit base for 15 minutes to allow it to set. This will help it hold its shape when the other layers are added.
- Melt the chopped dark chocolate using a double boiler or microwave in short bursts, stirring until smooth. Ensure the chocolate is fully melted and free of lumps for a smooth, creamy topping.
- Gently fold the melted chocolate into the whipped cream until fully combined. Be careful not to overmix, as this can deflate the whipped cream.
- Remove the chilled biscuit base from the refrigerator. Spread the chocolate whipped cream mixture evenly over the biscuit layer.
- Garnish the pudding with halved strawberries and a dusting of cocoa powder. The strawberries add a burst of freshness, while the cocoa powder enhances the chocolate flavor.
- Refrigerate the pudding for at least 2 hours to allow the flavors to meld and the pudding to set completely. Chilling enhances the textures and makes for a more refreshing dessert.
- Serve the chilled pudding and enjoy!


Recipe Notes
Good To Know
- For an extra flavor boost, briefly dip the digestive biscuits in coffee or a splash of orange juice before layering—this softens their texture and adds a subtle aromatic note to the pudding.
- If you prefer a firmer pudding that holds its shape when sliced, assemble the dessert in a loaf pan lined with plastic wrap and chill for at least 4 hours before unmolding and slicing.
- To create elegant individual servings, assemble the pudding in clear glasses or dessert jars, alternating biscuit and cream layers, and top each with a whole or halved strawberry for a visually appealing presentation.
- For a vegan version, use plant-based biscuits, dairy-free butter and whipped coconut cream, and substitute dark chocolate with a vegan variety.
Expert Tips
- Ensure your cream is well-chilled before whipping for optimal volume and stability.
- Don't overmix the pudding mixture, as this can lead to a dense texture. Fold ingredients together gently until just combined.
- For a richer chocolate flavor, use high-quality dark chocolate with a high cocoa content.
Storage Instructions
- Store leftover pudding in an airtight container in the refrigerator for up to 3 days. The texture may soften slightly over time.
Related Posts You May Like
-

-

No-Bake Chocolate Biscuit Balls Recipe
979 reads
-

-

-

-












Recipe Nutrition
Calories: 124kcalCarbohydrates: 13gFat: 9gSaturated Fat: 5gPolyunsaturated Fat: 1.2gMonounsaturated Fat: 2.4gCholesterol: 1mgSugar: 13g

Kanwaljeet Chhabra
Articles: 80
4 Comments
Leave a Reply
You must be logged in to post a comment.

This looks so inviting! I’m eager to try it.
What a delicious recipe! Thanks for posting.
This looks fantastic! Appreciate the share.
This looks so good! Appreciate the share.