Flaky Mint Paratha (Pudina Parantha): A Taste of India
2 hours 40 minutes
1332 reads
: A Taste of India - Plattershare - Recipes, food stories and food lovers")
About Flaky Mint Paratha (Pudina Parantha): A Taste of India
Savor the irresistible aroma of fresh mint and the delightful taste of homemade Pudina Paratha (Mint Paratha). This flaky Indian flatbread offers a comforting, aromatic escape to the heart of Indian cuisine.A simple blend of all-purpose flour, semolina, and vibrant mint leaves creates a soft, layered paratha that's perfect for any meal. From kneading the dough to achieving that perfect golden-brown crust, this recipe guides you every step of the way.Enjoy your warm, fragrant Pudina Paratha with a side of dal, curry, or raita for a truly satisfying culinary experience. It's a taste of India you'll crave again and again.
: A Taste of India - Plattershare - Recipes, food stories and food lovers")
Stop Thinking About What to Cook Every Day
Weight loss, PCOS, and Healthy Eating, all planned out for you. Just follow the plan and cook. From ₹399.
Recipe Time & More
Prep2 hours 20 minutes
Cook20 minutes
Total2 hours 40 minutes
Ingredients
Dough
Filling and Cooking
- 1 ½ cup Mint Leaves fresh, if unavailable, or dry
- 2 tbsp Ghee
- All-Purpose Flour for dusting
Instructions
- In a large bowl, combine the all-purpose flour, semolina, sugar, and salt.
- In a small bowl, dissolve the yeast in ½ cup of warm water. This activates the yeast and helps create a softer dough.
- Add the yeast mixture to the dry ingredients. Gradually add more water, kneading until a stiff dough forms. Kneading develops the gluten, resulting in a more pliable dough.
- Cover the dough and let it rest in a warm place for 2 hours, or until doubled in size. This allows the yeast to ferment and create air pockets, resulting in a lighter paratha.
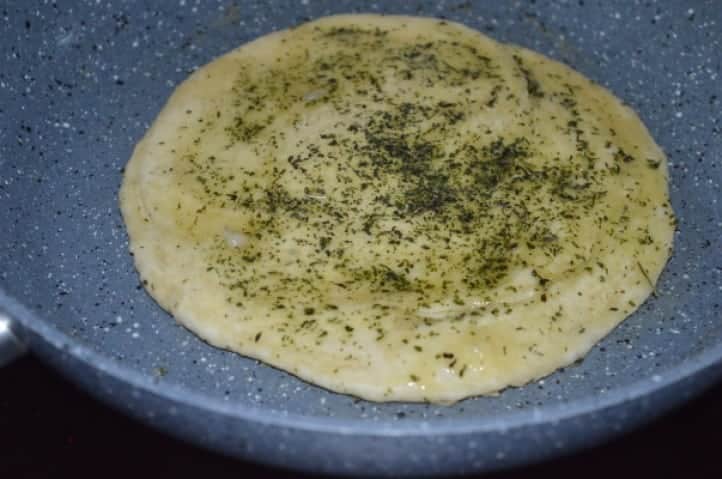
- Roll out a portion of the dough into a medium-sized circle. Spread a thin layer of ghee over the surface and sprinkle with a little flour. This layering technique creates the signature flaky texture of the paratha.
- Sprinkle some dried mint leaves over the ghee. Starting from one side, tightly roll the dough into a log. Then, coil the log into a spiral, tucking the end underneath.
: A Taste of India - Plattershare - Recipes, food stories and food lovers")
- Roll out the coiled dough again into a thin circle, dusting with flour as needed to prevent sticking.
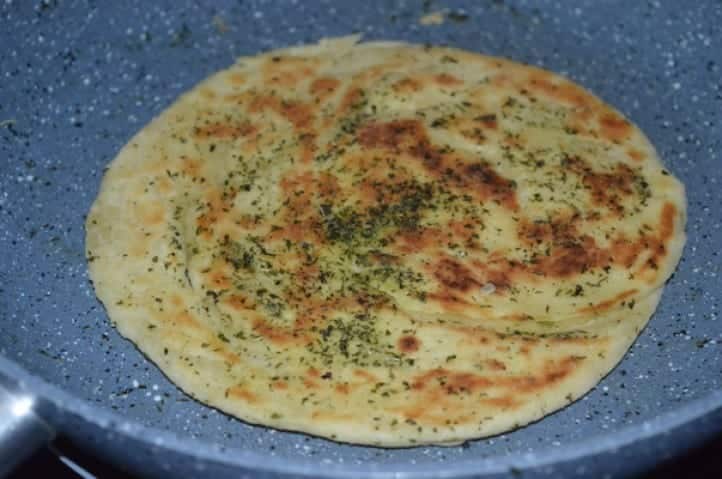
- Heat a tawa or flat griddle over medium heat. Cook the paratha for a few minutes per side, or until golden brown spots appear. Pressing gently with a spatula helps ensure even cooking.
- Spread a little ghee on both sides of the paratha as it cooks. This adds flavor and helps achieve a crispy exterior.
- Serve the hot Pudina Paratha with your favorite dal, curry, or raita.
: A Taste of India - Plattershare - Recipes, food stories and food lovers")
: A Taste of India - Plattershare - Recipes, food stories and food lovers")
Recipe Notes
Good To Know
- If you are using fresh mint leaves, roast them on a hot tawa (flat griddle), cool, and then crush into a powder.
- For an extra burst of flavor, add a teaspoon of crushed dried fenugreek leaves (kasuri methi) to the dough along with the mint—this enhances the herbal notes and adds complexity to each bite.
- If you prefer a crisper texture, roll the paranthas slightly thinner and cook them on a medium-high flame, brushing with ghee only once they are almost done to avoid sogginess.
- For a vegan version, substitute desi ghee with a neutral vegetable oil or vegan butter, and ensure any accompanying sides (like yogurt or raita) are plant-based.
Expert Tips
- Don't overwork the dough, as this can result in tough paranthas. Mix until just combined.
- Allow the dough to rest for at least 30 minutes before rolling. This allows the gluten to relax, making the paranthas softer.
- Experiment with different fillings! Try adding grated paneer, spiced potatoes, or even a sweet filling like coconut and jaggery.
Storage Instructions
- Leftover paranthas can be wrapped in a clean kitchen towel, placed in an airtight container, and refrigerated for up to 2 days.
- Reheat on a hot tawa or in the oven to revive their freshness before serving.
Related Posts You May Like
-

-
-

-

-
 - Plattershare - Recipes, food stories and food lovers")
-

Indian Parantha Burger
1161 reads: A Taste of India - Plattershare - Recipes, food stories and food lovers")

: A Flavorful & Healthy South Indian Delight - Plattershare - Recipes, food stories and food lovers")


 - Plattershare - Recipes, food stories and food lovers")

Recipe Nutrition
Calories: 571kcalCarbohydrates: 94gProtein: 12gFat: 15gPolyunsaturated Fat: 4.5gMonounsaturated Fat: 9gSodium: 1710mgFiber: 3gSugar: 2g

Meera Girdhar
Articles: 98
6 Comments
Leave a Reply
You must be logged in to post a comment.
Looks so mouthwatering! Thanks for sharing.
This looks incredible! I need to try it.
Looks incredible! Thanks for the details.
This is perfect! Can’t wait to taste it.
Want to have this now !!! Looks so Yummy 😀
Looks so good! Can’t wait to try it.