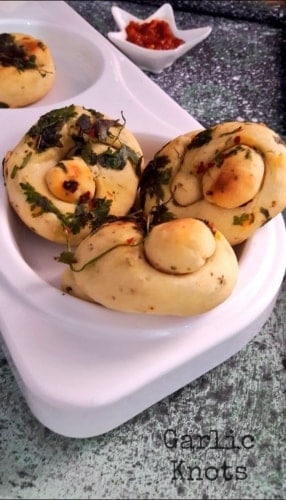
Irresistible Cheesy Garlic Knots: A Step-by-Step Guide
40 minutes
746 reads

About Irresistible Cheesy Garlic Knots: A Step-by-Step Guide
Craving something warm, cheesy, and utterly irresistible? These garlic knots deliver the perfect blend of crispy crust and soft, pillowy interior, bursting with savory garlic and herb flavor.Imagine sinking your teeth into a golden knot, with melted mozzarella oozing with every bite. This easy recipe guides you through every step, guaranteeing bakery-worthy results.Perfect as an appetizer, a side to your favorite soup, or a satisfying snack, these cheesy garlic knots will vanish in a flash!

Stop Thinking About What to Cook Every Day
Weight loss, PCOS, and Healthy Eating, all planned out for you. Just follow the plan and cook. From ₹399.
Recipe Time & More
Prep20 minutes
Cook20 minutes
Total40 minutes
Ingredients
Dough
- 1 cup All-Purpose Flour
- 1/2 tsp Active Yeast dry
- 1/2 tsp Sugar
- 1 1/2 tsp Salt
- 1 tsp Refined Oil
- 1/2 cup Water lukewarm
Flavor & Filling
- 1 tsp Butter cold
- 1 tsp Oregano dried
- 3 clove Garlic crushed
- 2 Tbsp Coriander chopped, fresh
- 3 Mozzarella Cheese cubed
Glaze
- 2 Tbsp Butter melted
Instructions
- In a small bowl, combine the active dry yeast, lukewarm water, and sugar. Gently stir to dissolve. Let the mixture stand in a warm place for about 10 minutes until foamy. This activates the yeast, which will help the dough rise.
- In a large bowl, whisk together the all-purpose flour, salt, and dried oregano.
- Cut in the cold butter using a pastry blender or your fingertips until the mixture resembles coarse crumbs.
- Make a well in the center of the dry ingredients. Pour in the yeast mixture and the refined oil.
- Using your hands or a stand mixer with a dough hook, knead the dough for 8-10 minutes until smooth and elastic. Kneading develops the gluten, giving the knots their chewy texture.
- Lightly grease a large bowl with oil. Place the dough in the bowl, turning to coat. Cover the bowl with plastic wrap or a damp kitchen towel.
- Let the dough rise in a warm place for 2-2 1/2 hours, or until doubled in size.
- Punch down the dough to release the air. Turn it out onto a lightly floured surface.
- Divide the dough into small, equal pieces. Roll each piece into a rope about 6 inches long.
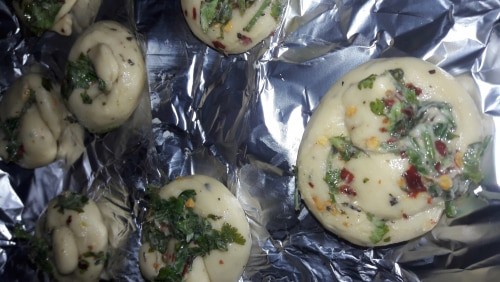
- Tie each rope into a knot. Tuck a cube of mozzarella cheese into the center of each knot.

- Preheat the oven to 400°F (200°C). Line a baking sheet with parchment paper.
- In a small bowl, combine the melted butter and chopped cilantro.
- Brush the knots with the butter-cilantro mixture.
- Bake for 15-20 minutes, or until golden brown and the cheese is melted and bubbly.

- Let the knots cool slightly before serving. Enjoy!


Recipe Notes
Good To Know
- For an extra cheesy twist, tuck a small cube of mozzarella or your favorite melting cheese into the center of each knot before baking.
- Brush the baked knots immediately with melted butter, finely chopped garlic, and fresh coriander or parsley for maximum flavor and a glossy finish.
- If you prefer a sweet-and-savory contrast, sprinkle with coarse sea salt and a tiny drizzle of honey right after baking.
- To freeze for later, shape and proof the knots, then freeze them on a tray. Once solid, transfer to a bag and bake straight from frozen, adding about 5 extra minutes to the bake time.
Expert Tips
- For a softer crust, cover the knots loosely with foil during the last 10 minutes of baking.
- Experiment with different fillings! Everything bagel seasoning, parmesan cheese, or chopped sun-dried tomatoes would be delicious additions.
- Don't over-knead the dough, as this can result in tough knots. Knead just until smooth and elastic.
Storage Instructions
- Store leftover knots in an airtight container at room temperature for up to 2 days or freeze for up to 3 months.
Related Posts You May Like


Recipe Nutrition
Calories: 293kcalCarbohydrates: 31gProtein: 4gFat: 17gSaturated Fat: 9gPolyunsaturated Fat: 2.4gMonounsaturated Fat: 4.8gCholesterol: 2mgSodium: 1140mgFiber: 1gSugar: 1g

Neha Paliwal
Articles: 87
7 Comments
Leave a Reply
You must be logged in to post a comment.
Absolutely mouthwatering! Great share.
What a flavorful dish! Thanks for sharing.
Looks so yummy! Excited to make it.
Thanks Kirti!Even i was also very much scared of baking but now its my stress buster..do start making breads.
These are killer….When Will that day come when I will start making bread. I tried once but failed.
Looks so incredible! Thank you for sharing.
I’m thrilled to try this recipe!