

Homemade Karonda Jelly Recipe: Tangy & Sweet Preserve

35 minutes
1287 reads
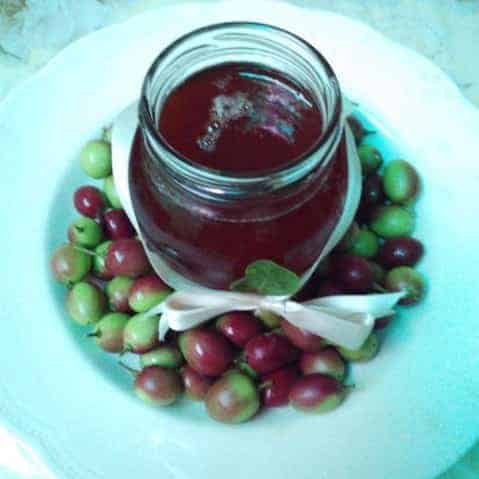
About Homemade Karonda Jelly Recipe: Tangy & Sweet Preserve
This recipe guides you through making delicious homemade Karonda jelly, a tangy and sweet preserve bursting with the unique flavor of Karonda berries. Karonda, also known as Carunda, is a rich source of Vitamin C, making this jelly a healthy and flavorful treat.Unlike store-bought versions, our recipe ensures you have complete control over the ingredients, resulting in a superior jelly with a vibrant color and exquisite texture. It's perfect for spreading on bread, biscuits, or enjoying as a delightful accompaniment to cheese.Follow our step-by-step instructions for a perfectly set jelly every time. It's easier than you think!
Stop Thinking About What to Cook Every Day
Healthy Eating, Kids Tiffin, PCOS and Weight loss meals, all planned out for you. Just follow the plan and cook. From ₹299.
Recipe Time & More
Prep15 minutes
Cook20 minutes
Total35 minutes
Ingredients
Karonda Preparation
- 500 gm Karonda Berries fresh, ripe karonda berries. also known as carunda.
Jelly Ingredients
- 350 gm Sugar granulated
- 1 tsp Citric Acid use less if you prefer a less tart jelly. optional: substitute with 1 tbsp lemon juice
- 1 cup Water for initial boiling and to adjust consistency if needed.
Instructions
Prepare the Karonda
- Wash the karonda berries thoroughly and cut them in half. Remove the seeds.
- Place the halved karonda in a large saucepan and add 1 cup of water. Bring to a boil over medium heat.
Extract the Juice
- Once boiled, carefully transfer the karonda mixture to a large, thin cloth or cheesecloth. Hang the cloth to allow the juice to drain completely into a bowl or container.
Make the Jelly
- Return the extracted karonda juice to the saucepan. Add the sugar and stir continuously with a wooden spoon or spatula over medium heat until the sugar dissolves completely and the mixture begins to thicken.
Add Citric Acid and Finish
- Remove the saucepan from the heat and stir in the citric acid. Taste-test the jelly to ensure the desired level of tartness.
Jar and Seal
- Sterilize your jars and lids to ensure a hygienic, air-tight seal. Pour the hot jelly into the jars, leaving a small headspace. Remove any air bubbles from the surface.
- Seal the jars immediately and allow them to cool completely.
Serving Suggestions
- Serve your Karonda jelly with bread, biscuits, crackers, or cheese. Enjoy!
Recipe Notes
Expert Tips for Perfect Karonda Jelly
- For a richer flavor, consider adding a pinch of ground cardamom or cinnamon to the jelly during the cooking process.
- The consistency of your jelly will depend on the amount of sugar used and the cooking time. Adjust accordingly to your preference.
- Properly sterilized jars are essential to prevent mold growth and ensure longer shelf life. Ensure they are thoroughly cleaned and dried before filling.
- If you encounter any foam or excessive scum during cooking, carefully skim it off with a spoon before adding citric acid.
Related Posts You May Like




Recipe Nutrition
Calories: 316kcalCarbohydrates: 82gProtein: 0.5gFat: 0.4gSaturated Fat: 0.01gPolyunsaturated Fat: 0.1gMonounsaturated Fat: 0.02gSodium: 3mgPotassium: 81mgFiber: 4gSugar: 74gVitamin A: 60IUVitamin C: 14mgCalcium: 9mgIron: 0.3mg

Geeta Biswas
Articles: 919
3 Comments
Leave a Reply
You must be logged in to post a comment.
Absolutely scrumptious! Thanks for the recipe.
This looks amazing! Thanks for sharing.
Thanks for the inspiration! Looks tasty.